Create an AWS Client VPN and Work Remote
This is a companion piece to Data Jammers’ Site-to-Site VPN article.
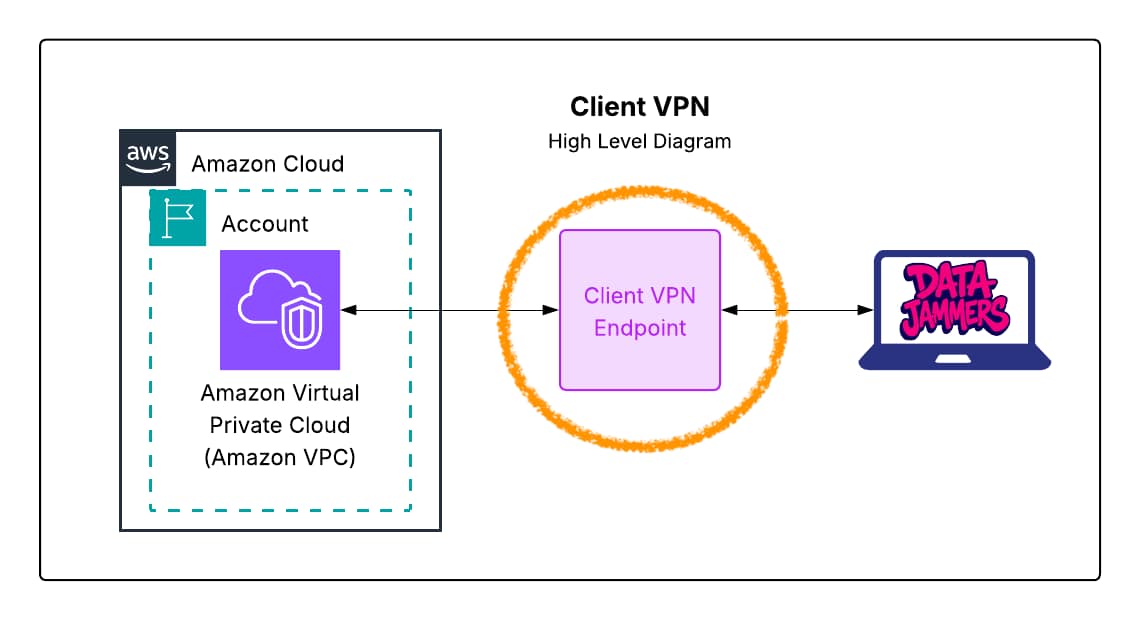
While a site-to-site VPN (Virtual Private Network) provides direct access from on-site (on-premises/office) location to a network in the AWS cloud, a client VPN allows a developer to install a client on their laptop and connect to a network in the AWS Cloud remotely.
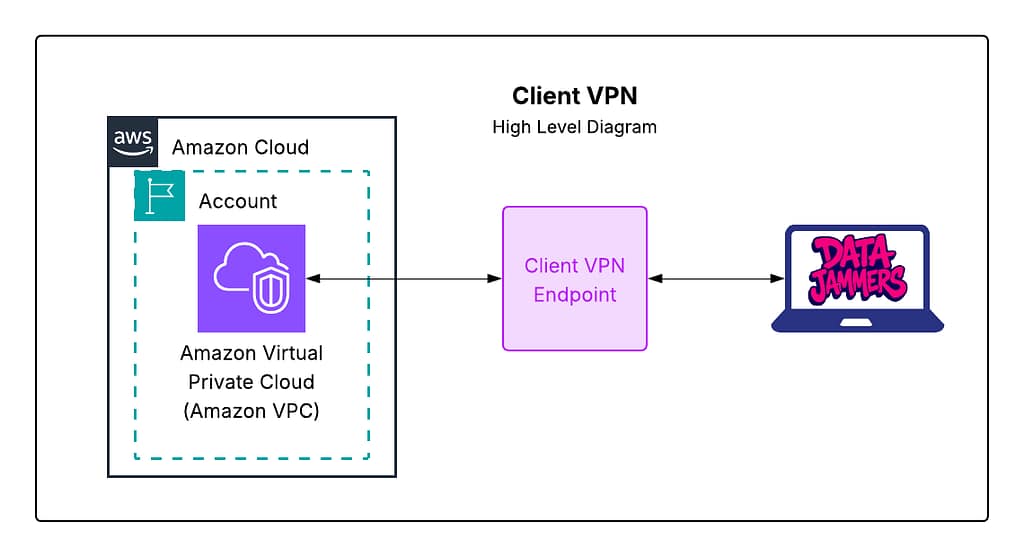
Use Case: As a Freelance Developer you’ve been issued a loaner MacBook and allowed to work remote. Even though you may have to brew your own morning cup of joe, you won’t have to commute for that warm cup of ambition ☕️. At least for a few months – you don’t have to come into the office unless you want to. But you need to access files on your agency’s internal network. These files can’t be accessed over the public internet. So your laptop has a client VPN tool installed. You connect, et voila, you are on the office’s local network with access to files.
A few years later, you’re making your own infrastructure. And now the fun part – building a client VPN. These steps will get you there:
- Set up a Virtual Private Cloud ☁️
- Create a Jumpbox 📦
- Mint Client/Server SSL Certificates with Keys 🗝️
- Create an Application Server 💻
- Set Up A VPN Endpoint 🔌
- Verify ClientVPN Traffic 🚦
- Verify Split Tunneling 🏁
- Clean Up 🧼🫧✨
You will also need to have access to the an AWS profile with access to the aws-cli (Command Line Interface). See this Data Jammers’ article for more information about how to set up the aws-cli.
1. Set Up A Virtual Private Cloud ☁️
First clone this starter code to your local computer or laptop. This repo contains a Cloud Development Kit (CDK) typescript project which will be the basis of this article. You will also need to bootstrap your AWS account for CDK. Once the github repo is downloaded, open terminal command and inspect the code with your Integrated Development Environment (IDE) of choice (Visual Studio Code or kiro is recommended).
To bootstrap your account for CDK development:
cdk bootstrap <your account #>/<your-home-region> --no-bootstrap-customer-key --cloudformation-execution-policies 'arn:aws:iam::aws:policy/AdministratorAccess'
First fork the source code repo into your github account. Then:
git clone https://github.com/<your github account>/client_vpn
cd client_vpn/
npm i # install dependencies to your local environment
cp .env.template .env # create a fresh .env file

kiro . (or) open . # open code in your IDE of choice

cdk synth # test that cdk script compiles into a cloudformation template
cdk deploy # deploy cloudformation into your aws account
This deployment instantiates the resources in the home region of your aws profile. The current specified resource is a baseline VPC with two public subnets and two private subnets. Observe this code located in the lib/client_vpn-stack.ts file.
const vpc = new Vpc(this, "DemoVPC", {
      ipAddresses: IpAddresses.cidr(CLOUD_CIDR),
      vpcName: "DemoVPC",
 });
cdk deploy will show the list of resources add to the newly-synthesized Cloudformation template.

Enter “y” to accept these changes. This will deploy a vpc (DemoVPC), into your aws account. All resources will be written to CloudFormation into your account and then visible in the VPC dashboard in the home region defined by your aws-cli profile.
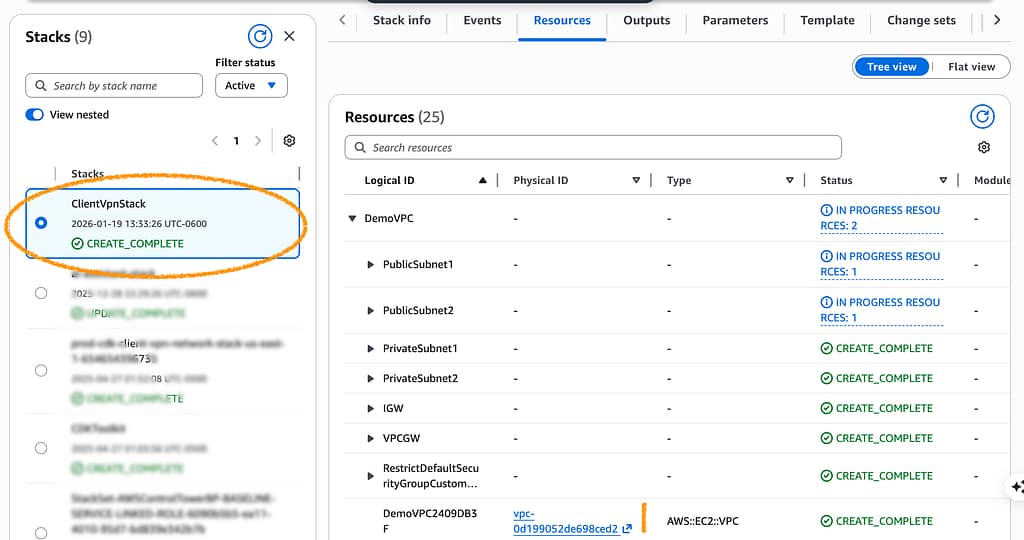
Click the link at the bottom to inspect DemoVPC in the VPC Console.

DemoVPC will be contained in the 10.0.0.0/16 CIDR range – meaning all resources in the VPC will have an internal ip address that starts with a 10.0. prefix. In CIDR notation, each of the four numbers represents an eight-digit binary string. Each number will be bewteen 0 and 256 (2 to the 8th power). A 16-bit mask creates an address block in which the first 2 numbers (representing 8 bits each) are identical.
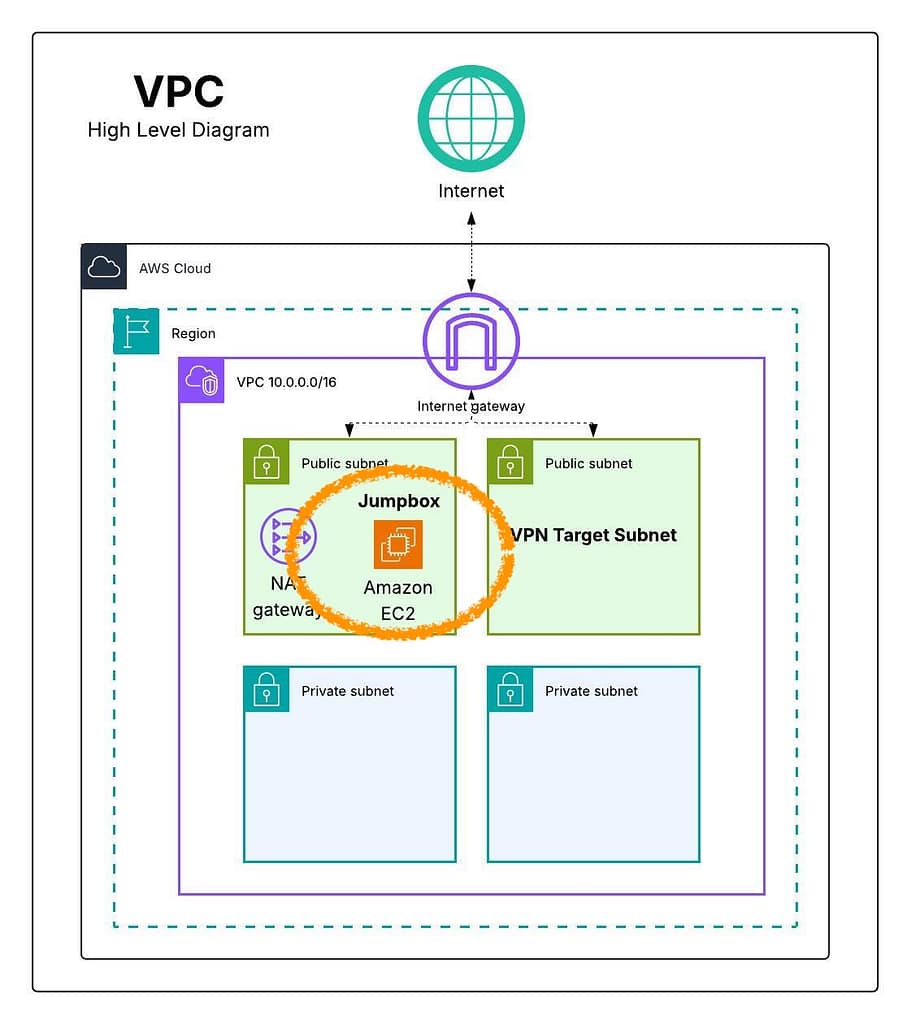
VPC resources will be deployed in either a public or a private subnet. DemoVPC contains two public subnets and two private subnets. While resources within the public subnets can accept inbound traffic from the internet, resources in private subnets can only initiate outgoing requests to the web using a NAT (Network Address Translation) Gateway. By default any resource within the VPC can reach any other resource deployed in the VPC.
2. Create a Jumpbox 📦
Securing the VPN connection requires client and server certificates. These certificates allow mutual authentication from the VPN client to the server endpoint. We will use a Linux server, and an open-source utility called OpenVPN to create these certificates. For a linux server we will launch an EC2 (Elastic Cloud Compute) instance in the first public subnet of the new VPC. This instance will serve as a context to create the client and server certificates, and also later as a jumpbox – a private, secure doorway into the VPN.
Find your public ip here. Your IP is the number the top of the page in the form ‘xxx.xxx.xxx.xxx’ where each xxx segment is an number in the range of 0 to 255. This is the unique address of your computer. Save your IP address to the .env file. Your .env file should now look like so:
MY_IP=<your ip>
KEY_NAME=
CLIENT_CERTIFICATE_ARN=
SERVER_CERIFICIATE_ARN=
Second – fetch this section’s code from the remote repo.
git fetch --all
git switch step_2-add-jumpbox
Thirdly, create and download an EC2 key-pair to access the jumpbox. Navigate to the EC2 page in the AWS console and select “Key Pairs”. Make sure that you are in your own account and region us-east-1.

Click ‘Create key pair’.

Name the key pair. Use RSA for the Key pair type and ‘.pem’ for the file format. Click ‘Create key pair’. This will download the .pem file to your computer.

Move that keypair from your downloads folder to a local .ssh folder.
mv ~/Downloads/<your key pair name>.pem ~/.ssh/
Give the key 400 permissions (read-only).
chmod 400 ~/.ssh/<your key pair name>.pem
Save the name of the key pair to the .env file. Note that the .pem suffix should be ignored.
MY_IP=<your ip>
KEY_NAME=<key_name>
CLIENT_CERTIFICATE_ARN=
SERVER_CERIFICIATE_ARN=
Examine the Step 2 code, which uses CDK typescript to create an EC2 Instance. A jumpbox, sometimes called a “bastion host”, is a security-hardened instance which a developer can ssh into for access resources in private subnets. In this demo, the jumpbox is also used to as a linux environment to create an ssl-certifcate.
In your code editor, open the lib/client_vpn-stack.ts file.
const jumpbox = new Instance(this, "JumpBox", {
      instanceType: new cdk.aws_ec2.InstanceType(INSTANCE_SIZE_TYPE),
      machineImage: cdk.aws_ec2.MachineImage.latestAmazonLinux2(),
      vpc,
      vpcSubnets: publicSubnets,
      keyName: KEY_NAME,
      securityGroup: jumpboxSG,
});
Notice the declaration of the jumpbox. It is only accessible when using a key. The security policy allows ssh traffic from your IP only. The jumpbox is located in a public subnet of the vpc created in Step 1.
Make sure you are using an AWS profile in the same account and region in which you created the keypair. From within the root directory of the repo, with your aws credentials properly loaded, enter cdk deploy. Click “y” to confirm the deployment.
When the CDK script has run, you there will be a new EC2 Linux jumpbox in your account. Select that jumpbox and grab the public IP of the instance.

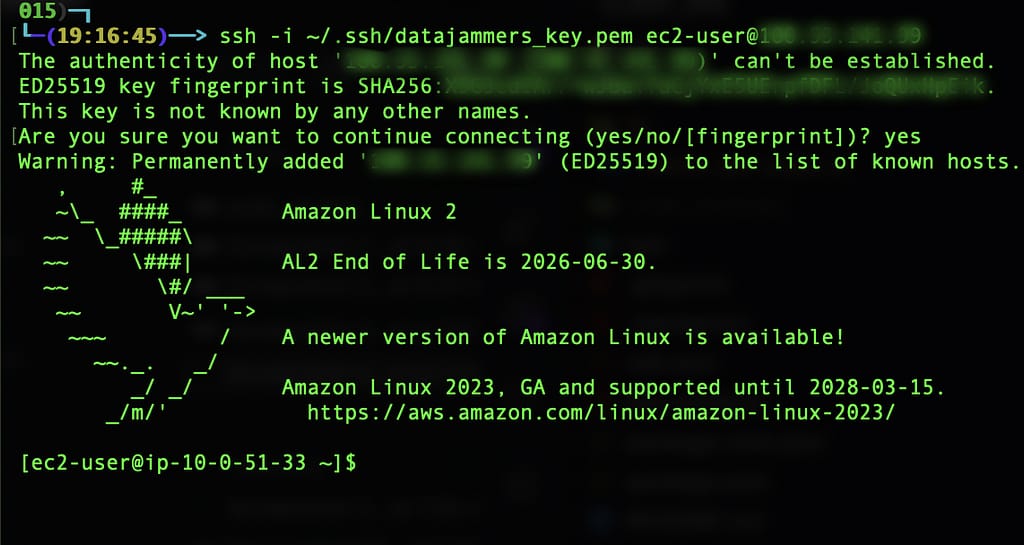
When the instance is running and 3/3 checks have passed, use the keypair downloaded earlier to ssh into the jumpbox. Note these ssh instructions are intended to be run on a mac. If you are using a windows machine, Putty is recommend for SSH. From your laptop, open a terminal insance and enter the following command.
ssh -i ~/.ssh/<your keypair name>.pem ec2-user@<public ip of jumpbox>
If successful, you will be asked if you are sure want to continue connecting. Enter ‘yes’. You should now see the command prompt on the LInux jumpbox, and its private IP. You are ‘ssh-ed in’.
3. Mint Client/Server SSL Certificates with Keys 🗝️
To create a create the client and server certificates, first download git to the jumpbox. Because the jumpbox is in a public subnet, it allows outbound and return traffic over http. We will use the OpenVPN easy-rsa library to create server and client ssl keys.
sudo yum install -y git
git clone https://github.com/OpenVPN/easy-rsa.git
This will pull down the easy-rsa repo to your jumpbox. The next commands will enable you to create a Certificate Authority. Note that certificates will be saved to /home/ec2-user/easy-rsa/easyrsa3/pki .
cd easy-rsa/easyrsa3 # move to easyrsa3 directory

./easyrsa init-pki
Next we will build a Certifcate Authority certificate.
./easyrsa build-ca nopass
You can give your certificate authority any name.

Create server certificate and private key.
./easyrsa build-server-full anydomain.com nopass
# (enter 'yes' to continue).

Create client certificate and key.
./easyrsa build-client-full client1.domain.tld nopass
# (enter 'yes' to continue).

Now that the keys and certificates have all been built, copy them to one directory, demo.
mkdir ~/demo
cp pki/ca.crt ~/demo/
cp pki/issued/anydomain.com.crt ~/demo/
cp pki/private/anydomain.com.key ~/demo/
cp pki/issued/client1.domain.tld.crt ~/demo/
cp pki/private/client1.domain.tld.key ~/demo/
cd ~/demo/
ls -la
the demo directory should look like so:

Now you can import the cerficate using the aws-cli. Note that the aws-cli is already installed, but you must authenticate with your user credentials to run the commands. To authenticate run aws configure . Or, if you have AWS Identity Center set up, you can use token-based authentication.
First import the server certificate into ACM (AWS Certificate Manager). Note that the region should be the same region as your vpc.
aws acm import-certificate --certificate fileb://anydomain.com.crt --private-key fileb://anydomain.com.key --certificate-chain fileb://ca.crt --region us-east-1

Now import the client certificate into ACM:
aws acm import-certificate --certificate fileb://client1.domain.tld.crt --private-key fileb://client1.domain.tld.key --certificate-chain fileb://ca.crt --region us-east-1

If you log into the AWS console and search for ‘Certificate Manager’, you should see the new certificates listed:
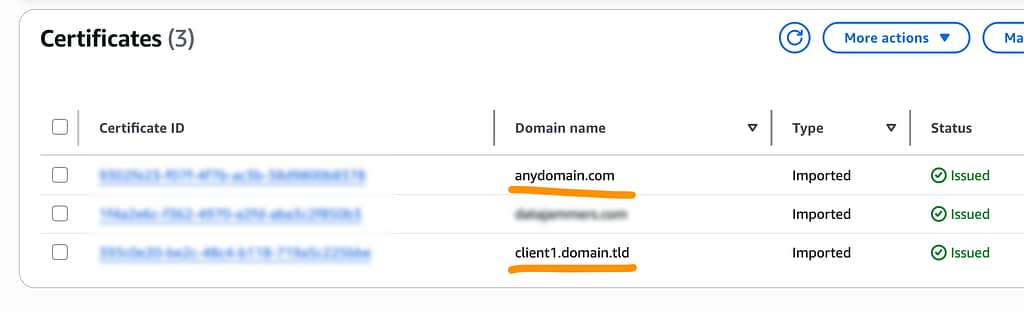
Within the AWS Console, navigate to AWS Certificate Manager and find the ARN (AWS Resource Number) of the Client and Server Certificates.
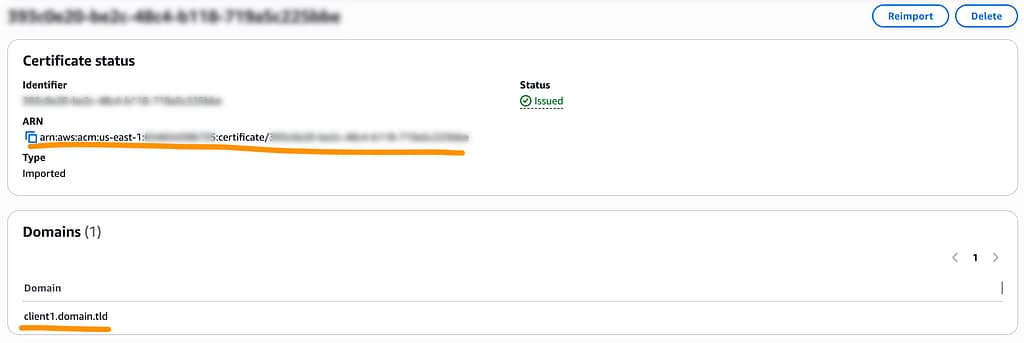
^ Client certificate. (note the domain)
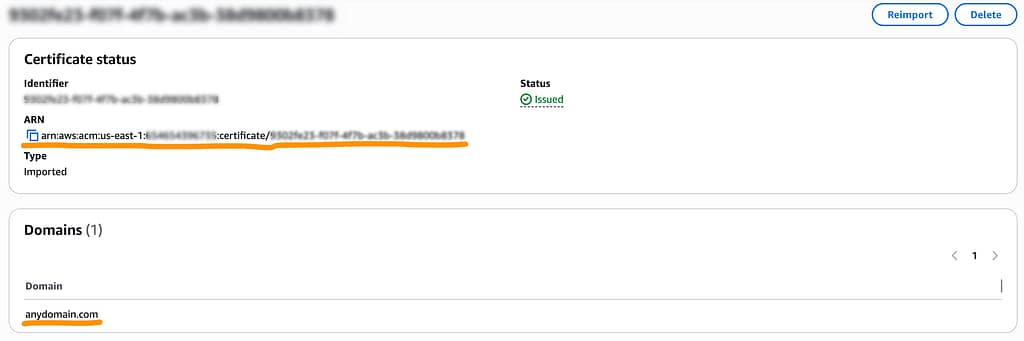
^ Server certificate.
Insert the Certificate ARNs into the .env folder as CLIENT_CERTIFICATE_ARN and SERVER_CERIFICIATE_ARN. Your .env file should now look like so (note the double quotes around the ARNs):
MY_IP=<your ip>
KEY_NAME=<key_name>
CLIENT_CERTIFICATE_ARN="<your client certificate ARN>"
SERVER_CERIFICIATE_ARN="<your server certificate ARN>"
You also need to copy the client server certificate and client key from the jumpbox to your local machine. Use the scp (‘secure copy’) command to download to your local machine. Use these commands from inside the root project directory on your laptop.
scp -i ~/.ssh/<your ssh key>.pem ec2-user@<jumpbox public ip>:demo/client1.domain.tld.crt client_vpn_resources/

scp -i ~/.ssh/<your ssh key>.pem ec2-user@<jumpbox public ip>:demo/client1.domain.tld.key client_vpn_resources/
4. Create Application Server 💻
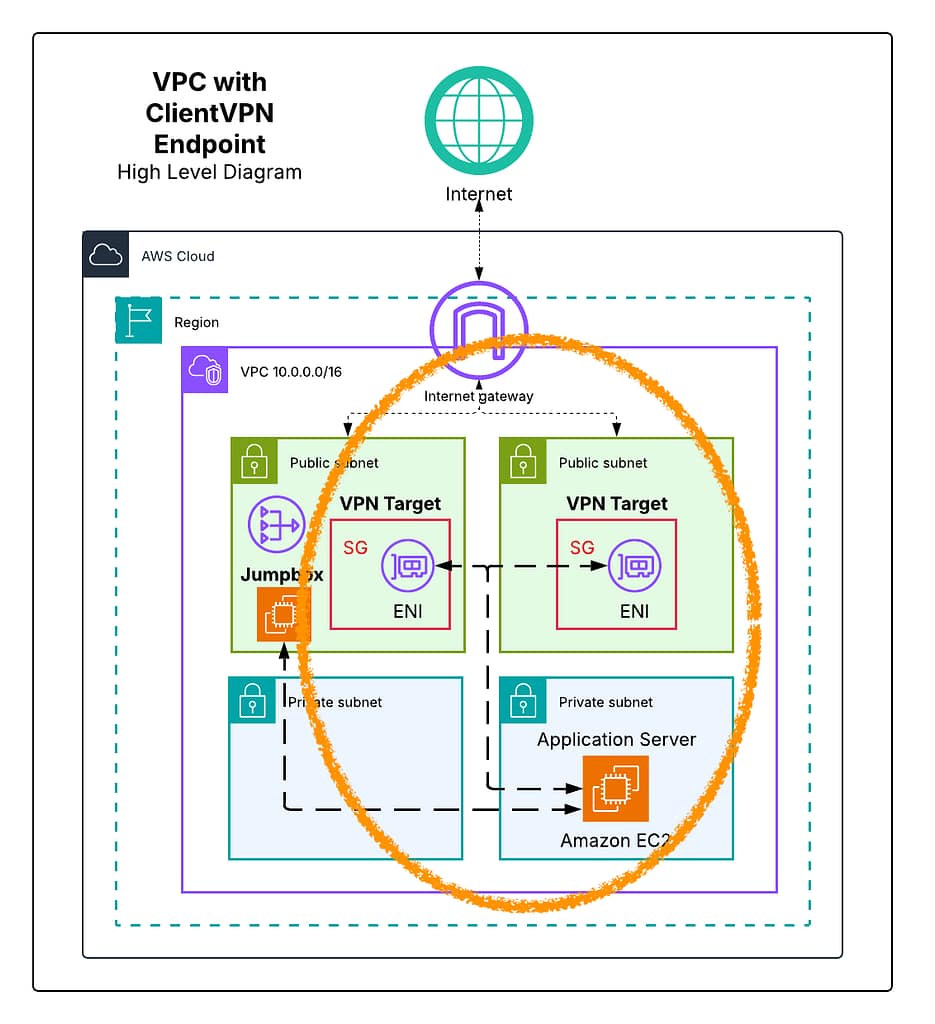
Let’s review the incoming changes to the target architecture. Both public subnets will contain an ENI (Elastic Network Interface) in a security group. Both subnets will be attached to the client vpn. An application-serving EC2 instance user sits in a private network, inaccessible by the public internet but accessible via the client vpn and the jumpbox.
The application server will have its own security group, which will allow inbound traffic from the security group of the vpn and inbound http traffic from the jumpbox security group.
To add these infrastructure changes to your IDE, pull the Step 4 branch from github.
git fetch --all
git switch step_4-add-app-server
cdk deploy
Note the updates and enter yes to approve.
Take a minute to observe the new changes to the cdk script. The application server user data creates an apache server which loads and index page showing the server’s IP. 169.254.169.254 is a special EC2 IP reserved by AWS for that instance’s metadata.
const userData = UserData.forLinux();

userData.addCommands(
      "sudo su",
      "yum update -y",
      "yum install -y httpd.x86_64",
      "systemctl start httpd.service",
      "systemctl enable httpd.service",
      'TOKEN=$(curl -X PUT "http://169.254.169.254/latest/api/token" -H "X-aws-ec2-metadata-token-ttl-seconds: 21600")',
      'PRIVATE_IP=$(curl -H "X-aws-ec2-metadata-token: $TOKEN" http://169.254.169.254/latest/meta-data/local-ipv4)',
      'echo "<h1>Application Private IP address is: $PRIVATE_IP</h1>" >> /var/www/html/index.html',
);

const appServer = new Instance(this, "ApplicationServer", {
      instanceType: new cdk.aws_ec2.InstanceType(INSTANCE_SIZE_TYPE),
      machineImage: cdk.aws_ec2.MachineImage.latestAmazonLinux2(),
      vpc,
      vpcSubnets: {
        subnetType: SubnetType.PRIVATE_WITH_EGRESS,
      },
      keyName: KEY_NAME,
      securityGroup: appSG,
      userData,
});
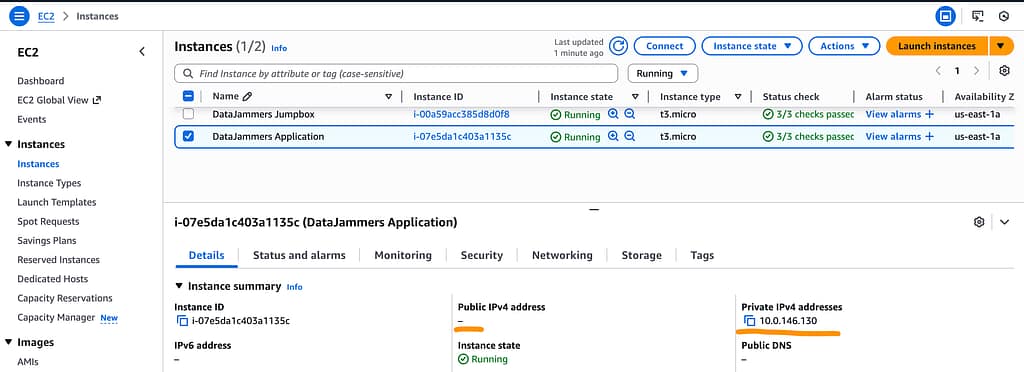
Within the AWS console, navigate to the EC2 page. You should see two instances listed now, the application server and the jumpbox. Click the checkbox next to the application server to see its details. Note the application server does not have an Public IPv4 address, so it will not be publicly accessible.
Copy the application server’s private IP. This IP will be only accessible internally. Initially we access the application server from the jumpbox, later we will use the client vpn for access.
From the terminal, ssh back into the jumpbox as before.
ssh -i ~/.ssh/<your keypair name>.pem ec2-user@<public ip of jumpbox>
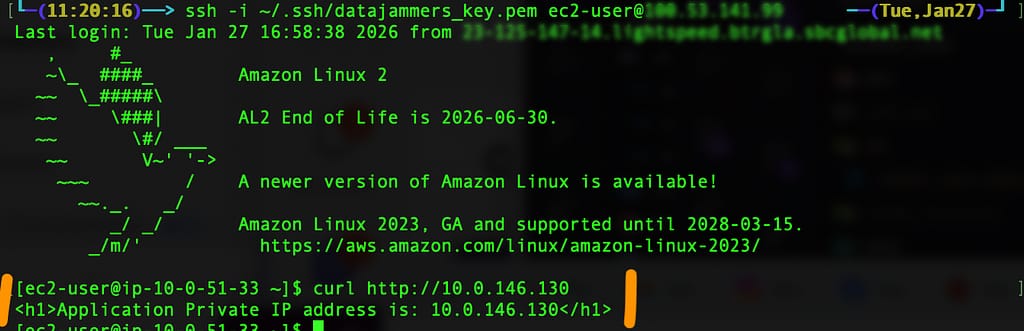
Once ssh’ed into the jumpbox, curl the private IPv4 of the application server.
curl http://<application server private Ipv4 address>
You should see a connection message which echoes the private IP of the app server. This proves that the application server is providing internal traffic.
Note that this only internal traffic from the jumpbox to the application. If curl the internal url from a regular terminal session on our laptop without ssh’ing into the jumpbox first, the curl command will have no response. The application server is running, our VPC setup is nearly complete. We can move on to setting up the VPN endpoint.
5. Set Up A VPN Endpoint 🔌
The VPC is nearly complete – with public and private subnets, a private application servers and a secured jumpbox. The VPN endpoint will connect the client (remote worker) with the cloud network. Like previous steps, the code is available in a git branch from the main repo. From within your code directory, pull in the step 5 branch from the repo to get the latest changes.
git fetch --all
git switch step_5-add-vpn-endpoint
This new code instantiates a Client Vpn Endpoint in the public subnets of our custom VPC, using the subnet group we created earlier.
const clientVpnEndpoint = vpc.addClientVpnEndpoint("Endpoint", {
      cidr: REMOTE_CIDR,
      serverCertificateArn: SERVER_CERIFICIATE_ARN,
      clientCertificateArn: CLIENT_CERTIFICATE_ARN,
      securityGroups: [vpnSG],
      vpcSubnets: {
        subnetType: SubnetType.PUBLIC,
      },
});
From within the code directory enter cdk deploy. Enter “y” at the prompt and cdk will continue to install the Client VPN Endpoint in your account. This will take some time to complete (~20 minutes ⏳).
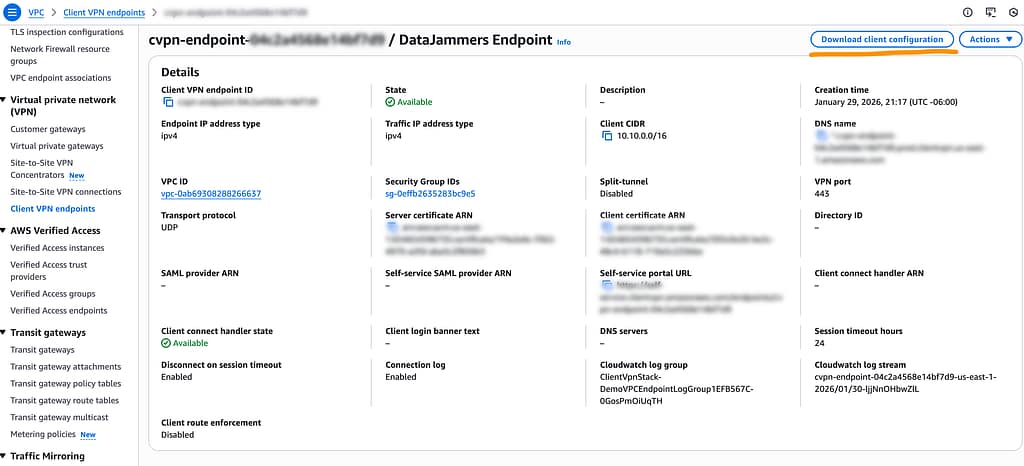
When the deployment is fully complete the new resources will include not only the VPN endpoint, but subnet associations, authorization rules and a log table. Navigate to the Client Endpoint (VPC > Virtual private network (VPN) > Client VPN endpoints) in the console to explore.
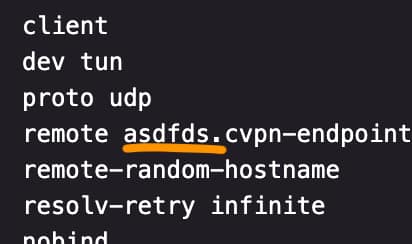
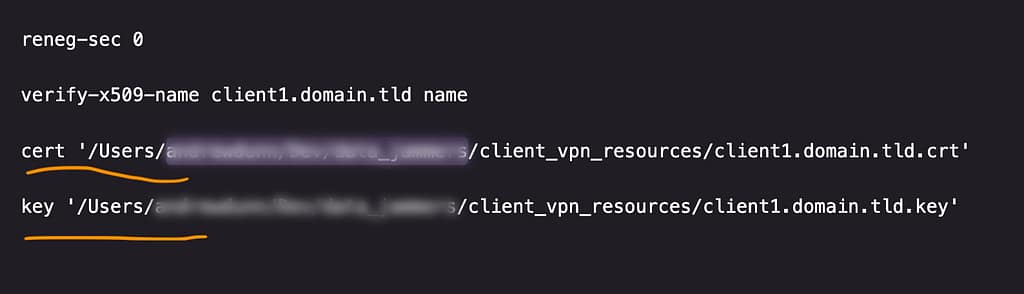
Download the client configuration and move it to client_vpn_resources directory where the client key and client certificate is located.
Open the file in your code editor and make three adjustments. First, near the top of the file, prepend a random string to the start of the remote DNS address. This creates a random subdomain, be sure to include the trailing period. Second, add two lines to the bottom of the VPN declaring the absolute paths the to client server and client key on your local machine.
6. Connect to VPN and Verify Traffic 🚦

You will need to install a client to your laptop or computer to reach the Client VPN endpoint. Download the OpenVPN Connect client here : ( Mac | Windows ) and install to your laptop. Once the client has installed, double-click the newly modified configuration file, which should now be in the client_vpn_resources/ directory. The OpenVPN Connect client should launch. Toggle the connection to connect to your vpn endpoint. After the magic moment that your VPN launches, open a terminal window. curl the application server by its private IP. If you see the machine’s success message with its private (internal) IP address – you’re in. You have accessed the internal network through the client VPN endpoint, without a jumpbox.

if you toggle the connection off, and you should no longer be able to curl the application’s private IP. The internal application can only be reached while the VPN client is connected. The client VPN is nearly complete.
However, there is a problem. When the client is active, it blocks web traffic for your machine. If you open a web browser, websites can’t be reached. If you try ping google ( ping google.com ) from your terminal to verify connection, the google server cannot be reached; a “Request timeout” is returned.

There are two solutions here. The first solution is suboptimal – described here. We will implement a better solution.

So how do we allow only internal network-bound traffic through the client VPN, while still allowing your laptop to access the internet directly as usual, without passing through the client VPN connection?
There is a better solution: Split Tunneling.
7. Verify Split Tunneling 🏁
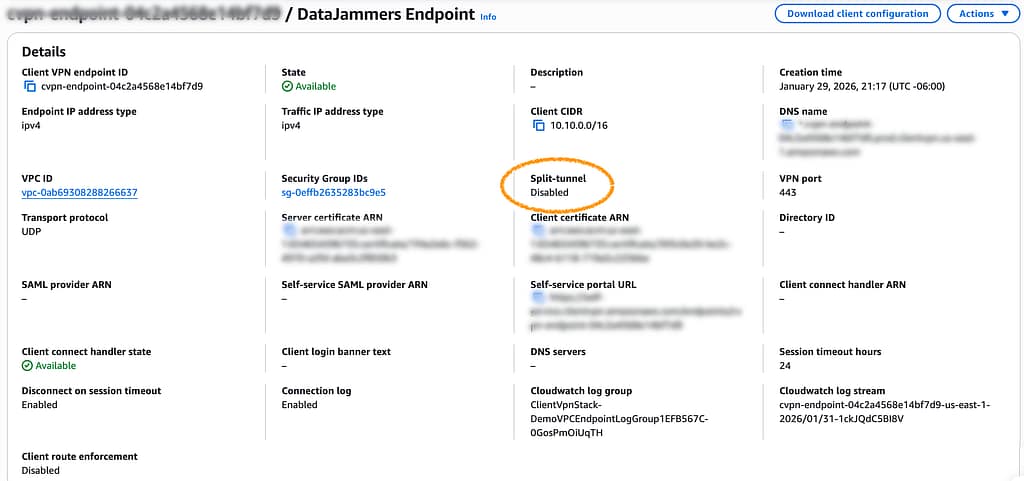
When the client VPN is split tunnel-enabled, only internal network-bound traffic will be accepted into the VPN tunnel. Note in the VPN console that Split-tunnel is currently disabled.
As before, pull down the latest branch to your local machine. Make sure the VPN is not connected.
git fetch --all
git switch step_7-split-tunnel
cdk deploy
Note that this branch adds a splitTunnel parameter to the Client VPN endpoint. The splitTunnel parameter ensures that only traffic matching client VPN endpoint routes is routed through VPN tunnel. All other traffic does not enter the clientVPN, continuing to the web as if the ClientVPN does not exist.
const clientVpnEndpoint = vpc.addClientVpnEndpoint("Endpoint", {
      cidr: REMOTE_CIDR,
      serverCertificateArn: SERVER_CERIFICIATE_ARN,
      clientCertificateArn: CLIENT_CERTIFICATE_ARN,
      securityGroups: [vpnSG],
      vpcSubnets: {
        subnetType: SubnetType.PUBLIC,
      },
      splitTunnel: true,
    });
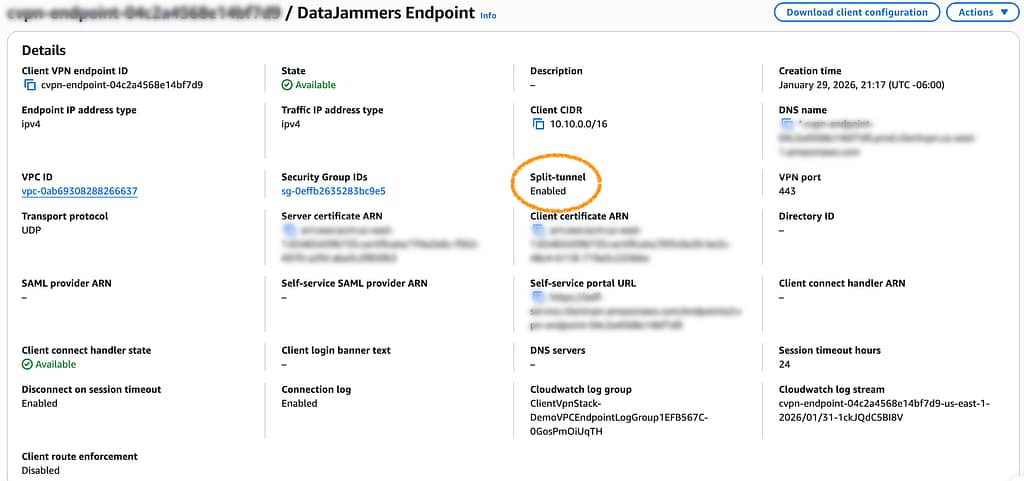
After deployment completes, note that split tunneling is now enabled in the console.
To test connect the OpenVPN client. From a terminal window, without using the jumpbox, curl the private IP of the application server and note the succesful response. Then ping google.com to test web connectivity. Note that the ping request returns icmp (internal connection message protocol) metadata.
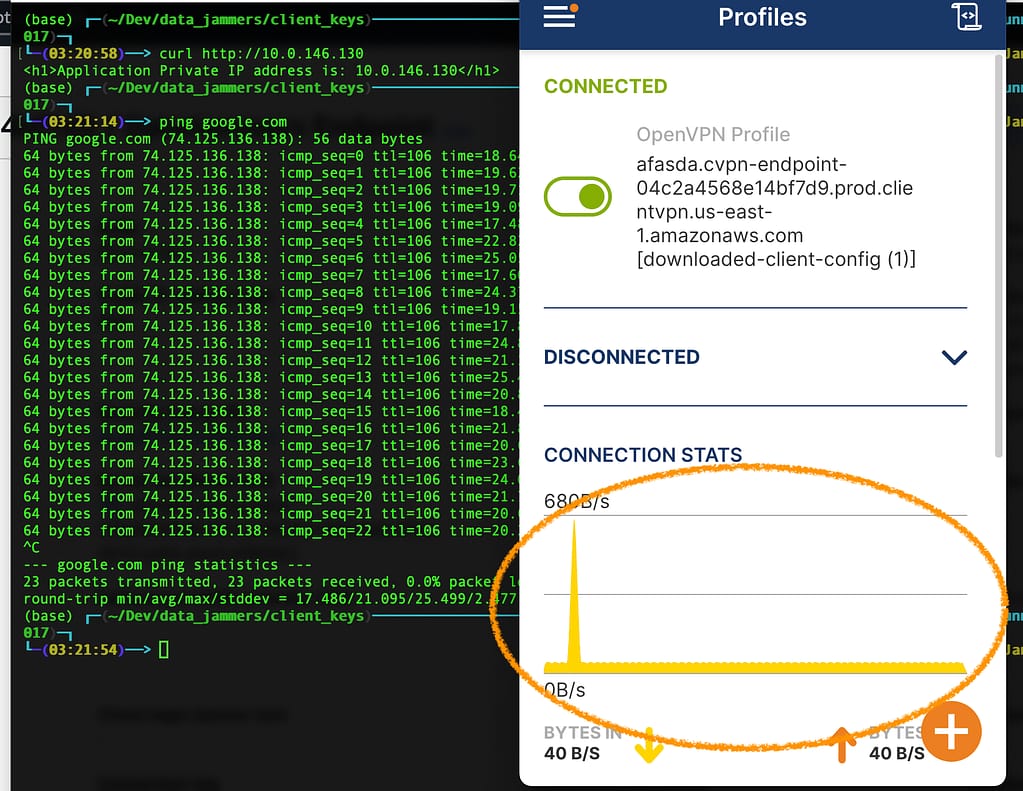
Observe the spike in the CONNECTION STATS. The spike occurs during the curl request. Before and after the ping request, the BYTES IN sits in a resting state. This proves that web-bound requests are not traveling through the client vpn. Load your favorite web page in a browser and it should function as normally, without extra lag.
8. Clean Up 🧹🧽🧼🫧
You’ve made it this far, Congratulations! 🎉 Please leave a comment and let me know if you ran into any issues. If you are stuck, retrace your steps, check the environment variables. When you are finished, you’ll want to remove all the resources from your AWS account created by this tutorial or you may receive a significant bill. CDK provides a command to delete the CloudFormation stack and all resources contained in it. From within your terminal, enter:
cdk destroy
This will halt any billing. Run this command to delete each of your certificates from ACM:
aws acm delete-certificate --certificate-arn <certificate arn>
Finis ✅.
This article was inspired by Chetwan Agrawal’s excellent udemy tutorial.


0 Comments